Real-life IoT implementations involves millions of devices having different hardware platforms and wireless connectivity protocols deployed at hundreds of locations. At that scale, treating each device individually is close to impossible. Gateway platforms work as the core building blocks to make your IoT devices securely connected to cloud services as easy as possible, so you can focus on adding real value to your IoT application. Gateways play a key role in all facets of IoT solution – from device connectivity management, security, interoperability, scalability, edge computing to cloud integration. Indeed, selecting the right Gateway is critical to your long-term success.
In this article, we’ll show you how easily you can connect and control Zigbee or BLE sensors or devices using AWS IoT Platform, HomeBridge® Gateway, and Connected Mobile Application. In this case, we’ll walk you through, how to configure AWS IoT Core to connect and control a Zigbee light bulb using HomeBridge®. The same demo is applicable for other Zigbee or BLE devices.
Why Enterprise leverage AWS IoT Core Services to build great IoT solutions?
Using Aws IoT Core service, one can implement and perform several functions at reduced time and complexity. Here are some key out-of-box features of AWS IoT Core:
- AWS IoT Device SDK enables your devices to connect, authenticate, and exchange messages with AWS IoT Core using the MQTT, HTTP, or WebSockets protocols.
- AWS Device Gateway Service maintains long-lived, bidirectional connections, enabling these devices to send and receive messages at any time with low latency.
- Message Broker Service supports messaging patterns ranging from one-to-one command and control messaging, to one-to-one million (or more!) broadcast notification systems and everything in between.
- Authentication and Authorization service supports the AWS method of authentication (called ‘SigV4’), X.509 certificate-based authentication, and customer created token-based authentication (through custom authorizers). You can create, deploy and manage certificates and policies for the devices from the console or using the API. Those device certificates can be provisioned, activated and associated with the relevant IoT policies that are configured using AWS IoT Core. This allows you to instantly revoke access for an individual device if you choose to do so.
- Registry service establishes a unique identity for devices and tracks metadata such as the devices’ attributes and capabilities.
- Device Shadow service persists the last reported state and desired a future state of each device even when the device is offline. You can retrieve the last reported state of a device or set a desired future state through the API or using the rules engine. It makes it easier to build applications that interact with your devices by providing always available REST APIs.
- Rules Engine Service makes it possible to build IoT applications that gather, process, analyze and act on data generated by connected devices at a global scale without having to manage any infrastructure. It routes messages to AWS endpoints including AWS Lambda, Amazon Kinesis, Amazon S3, Amazon Machine Learning, Amazon DynamoDB, Amazon CloudWatch, Amazon Simple Notification Service (SNS), Amazon Simple Queue Service (SQS), AWS IoT Analytics, Amazon Elasticsearch Service with built-in Kibana integration, and AWS Step Functions. External endpoints can be reached using AWS Lambda, Amazon Kinesis, Amazon SNS, and AWS Step Functions.
Before we get started with the demo, here is a quick overview of HomeBridge® Gateway Platform.
About HomeBridge®: HomeBridge® is a commercial-ready easily configurable IoT Gateway Platform comes with embedded AWS IoT Device SDK and AWS IoT Cloud connected mobile application. It enables OEMs and enterprises to quickly and easily connect, control and manage Zigbee or BLE devices to AWS IoT Core Platform. Some key features of HomeBridge® Gateway Platform are:
- Multiple wireless connectivity options: Zigbee, BLE, Z-Wave, Wi-Fi and other on demand
- SDK based secure MQTT connectivity with industry-leading Cloud Platforms: AWS IoT, Ayla Networks, Everything, and other on demand
- Edge computing capabilities: Enables local compute, messaging, data caching, data filtering, and sync capabilities for connected devices
- Improves response time: Eliminate dependency on intermittent networks, reduce the cost of running IoT applications for all requests and offer seamless user experience.
- Powerful device + user management: Mobile Application supports multiple gateway, 40+ devices/per gateway and multiple location connectivity;
- Rules Engine and Scene Management: Customizable rules engine for use case based real-time alerts, automation, scheduled control options for connected devices.
Here is a sample solution architecture to understand how HomeBridge® gateway and AWS IoT core accelerate time to implement any IoT Solution use case.
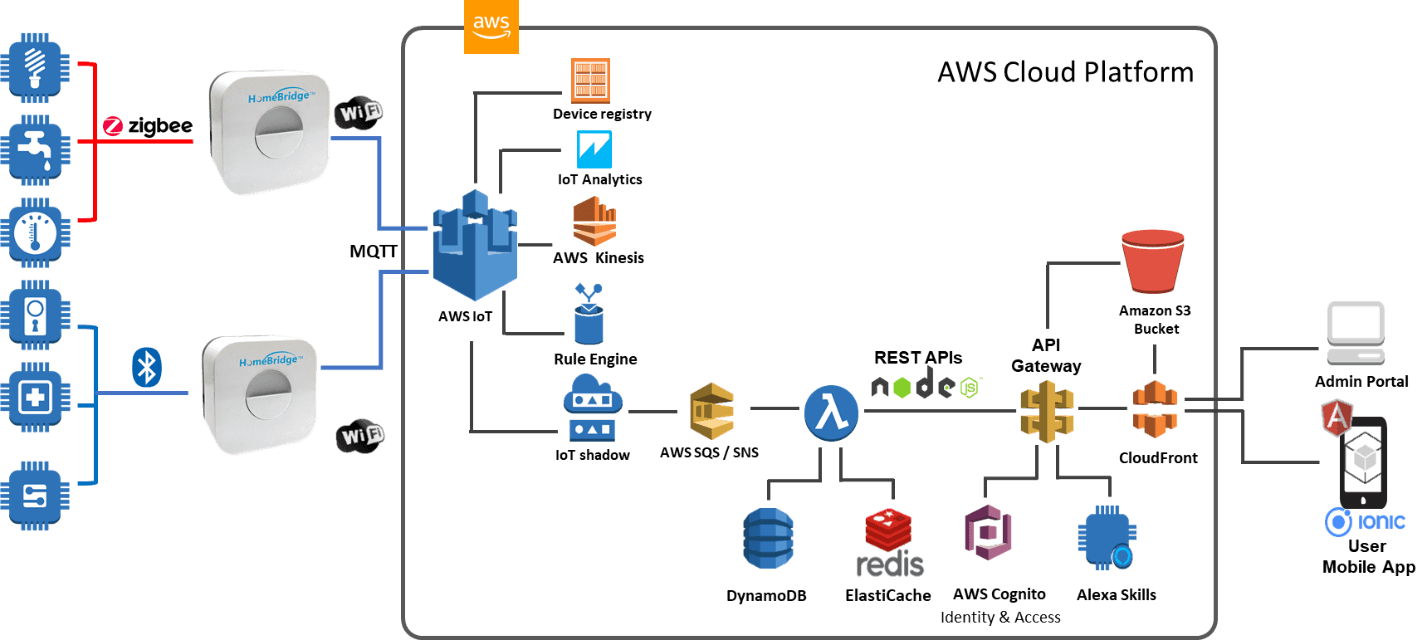
All these components can run in a single AWS IoT account. However, it is more common to see the HomeBridge® to AWS IoT Integration tier running in end user’s AWS account and the AWS IoT and end-user application components running in a Customer/OEM’s AWS account.
If you are looking forward to building your own IoT solution leveraging your choice IoT devices, please Contact us to implement your custom IoT use case.
Quick Demo: Connect and Control Zigbee/BLE Device to AWS IoT Services using HomeBridge® Gateway
bee/BLE Device to AWS IoT Services using HomeBridge® Gateway
To demonstrate, how easily you can integrate HomeBridge® with AWS IoT Core, we’ve built a small demo project using a Zigbee light device, HomeBridge® Gateway kit and AWS IoT account.
IoT device having Wi-Fi, Zigbee or BLE interface can communicate directly with AWS IoT but for that, you need to install AWS IoT SDK on devices. In this case, HomeBridge® gateway manages secure connectivity between device and AWS IoT; thus, devices, therefore, do not need to have the AWS IoT SDK installed. Request for HomeBridge® Gateway with pre-embedded AWS IoT device SDK to enable device data flowing securely from devices to HomeBridge® to AWS IoT Core.
To build this demo you need the following:
- HomeBridge® Gateway Kit (request us AWS IoT Device SDK enabled Kit)
- HomeBridge® Mobile App (request us AWS IoT Core connected Mobile app)
- AWS IoT Core Account (AWS IoT Core Sign In)
The high-level steps to configure this demo are:
Follow the extensive HomeBridge® getting started guide and videos on how to commission and connect the device into HomeBridge®. We’ve set up this demo using the same documentation. If you need any further information or to update the firmware and configure the development environment for the gateway, kindly contact us.
Once you have created your account, you can log in and navigate to the AWS IoT Console.
Once you are on the AWS IoT Console page, make sure you have selected a region that is close to your location. We’ve selected the US East (N. Virginia) region as shown in the following screenshot:
- From the side menu, navigate to Manage | Things and you should see a screen as shown below

- Next, click on the Register a thing button and you should see a screen as shown here:

- Now, we are going to Add HomeBridge® Gateway. So, click on Create a single thing
- On the next screen, we will start filling in the form by naming the device. I have called my device “Homebridge®-Gateway”. You can give your Gateway any name, for example, “Kitchen-Gateway”; but do remember to update the code where applicable

- Next, we are going to apply a Type. Since this is our gateway device, we are going to create a new Type called “Gateway”. Click on Create a thing type and fill in the form as shown in the following screenshot:

- Next, we are going to add Gateway device to a group—a group of smart light nodes. You can group your devices as per your requirements and classification. You may group end nodes in motion sensor, door sensor, power sensor or other having similar attributes/properties
- Now, click on Create group and create it with the following values: We have added three attributes (status, color, brightness) to identify this group easily, as shown in the below screenshot

- Click on the Create thing group and this will create a new group—select that value as the default. These are the only Things we are going to set up in this step
- Now at the bottom of the page, click on the Next button
- Now that we have our Thing set up in AWS IoT, we are going to complete the remaining operation from Mobile Application to send data. The Basic steps for monitoring status and the controlling light bulb is shown in the getting started guide and video tutorial.


- Open AWS IoT Thing page in the AWS Console and click on the Shadow tab, we should see the last record that we have sent update here:

There are two approaches as to how you can get the shadow data:
- Using the REST API: https://docs.aws.amazon.com/iot/latest/developerguide/device-shadow-rest-api.html
- Using MQTT-SNL: https://docs.aws.amazon.com/iot/latest/developerguide/device-shadow-mqtt.html
The above demo used the MQTT approach to fetch the shadow data.
Now, we need to create a certificate for the Thing. AWS uses certificate-based authentication and authorization to create a secure connection between the device and AWS IoT Core. Your screen should look as shown here:
- Under One-click certificate creation (recommended), click on the Create certificate button. This will create certificates as shown in the following screenshot. Do not share these certificates with anyone. These are as good as the username and password of your device to post data to AWS IoT

- Once the certificates are created, download the following:
- Client certificate: [x].cert.pem
- Public Key: [x].public.key
- Private Key: [x].private.key
- Root CA
- Once you have downloaded the keys, click on the Activate button
- Once the activation is successful, click on the Register Thing button and a new Thing named “Homebridge®-Gateway” will be created. Click on “Homebridge®-Gateway” and you should see something like this:

- Now, go to the main console and select the security tab as shown in below screen:

- Go back to the Things page, and from the side menu on this page, select Secure > Policies. Since we did not create any policies, we have filled up form as shown below. In this demo, we are allowing any kind of IoT operation to be performed by the device that uses this policy and on any resource. This is a dangerous setup, mainly for production; however, this is okay for learning purposes

- We are not done with the setup yet. We still need to attach Policy with a certificate to proceed. Navigate to Security | Certificates and, using the options available at the top-right of the certificate we created, we are going to attach the policy:

- Click on Attach policy on the previous screen and select the policy we have just created and Attach to complete the setup as the screen shown below
 With this, we are done with the setup of a Thing.
To implement your custom IoT Solution, please Contact Us

About the Author: Mayank Kanazariya
Mayank is associated with VOLANSYS Technologies as a Sr. Engineer. He has served in multiple industry verticals and worked upon many tools and technologies till now in his journey. Being passionate, he always looks forward to the opportunities to bring both performance and cost optimized solutions.
